Monday, December 3

Radish Green Subji with Bajra Roti

For winters, bajra is good for the body as it produces heat. It is also a very healthy, gluten free diet with very good taste and flavor. Bajra roti with radish green subji is a great combo; we got introduced to it in our childhood by our family friend, Urmila Aunty. Thanks to her, it has been one of our favorites for cool winters.

Original recipe Source: Urmila aunty

Ingredients:

For Roti:
1. Bajra flour - 2 cups
2. Salt as per taste
3. Oil - 1 tbsp
4. Ajwain - 1/2 tsp
5. Butter/ oil/ghee - 2 tbsp

For Subji:
1. Radish greens - 1 bunch
2. Cumin seeds - 1/2 tsp
3. Carom seeds -1/2 tsp
4.Asafoetida - 1 pinch
5. Salt to taste
6. Chili powder - 1 tsp
7. Dry mango powder - 1/2 tsp


Method:

For Roti:
Step 1: Mix all the given ingredients and then add water little at a time and mix until you get a soft dough. Leave it for 15 minutes.
Step 2: Divide into portions that make 2.5" diameter ball. Pat it into 0.5 cm thick circles using a plastic cover so that it peels of easily.
Step 3: Heat a tawa, grease butter/ oil/ ghee and roast it on both the sides well. Make rotis on medium heat to ensure it is cooked well in the center. Keep pressing with flat ladle on the surface of the roti while cooking to avoid cracking and for uniform cooking.

For Subji:
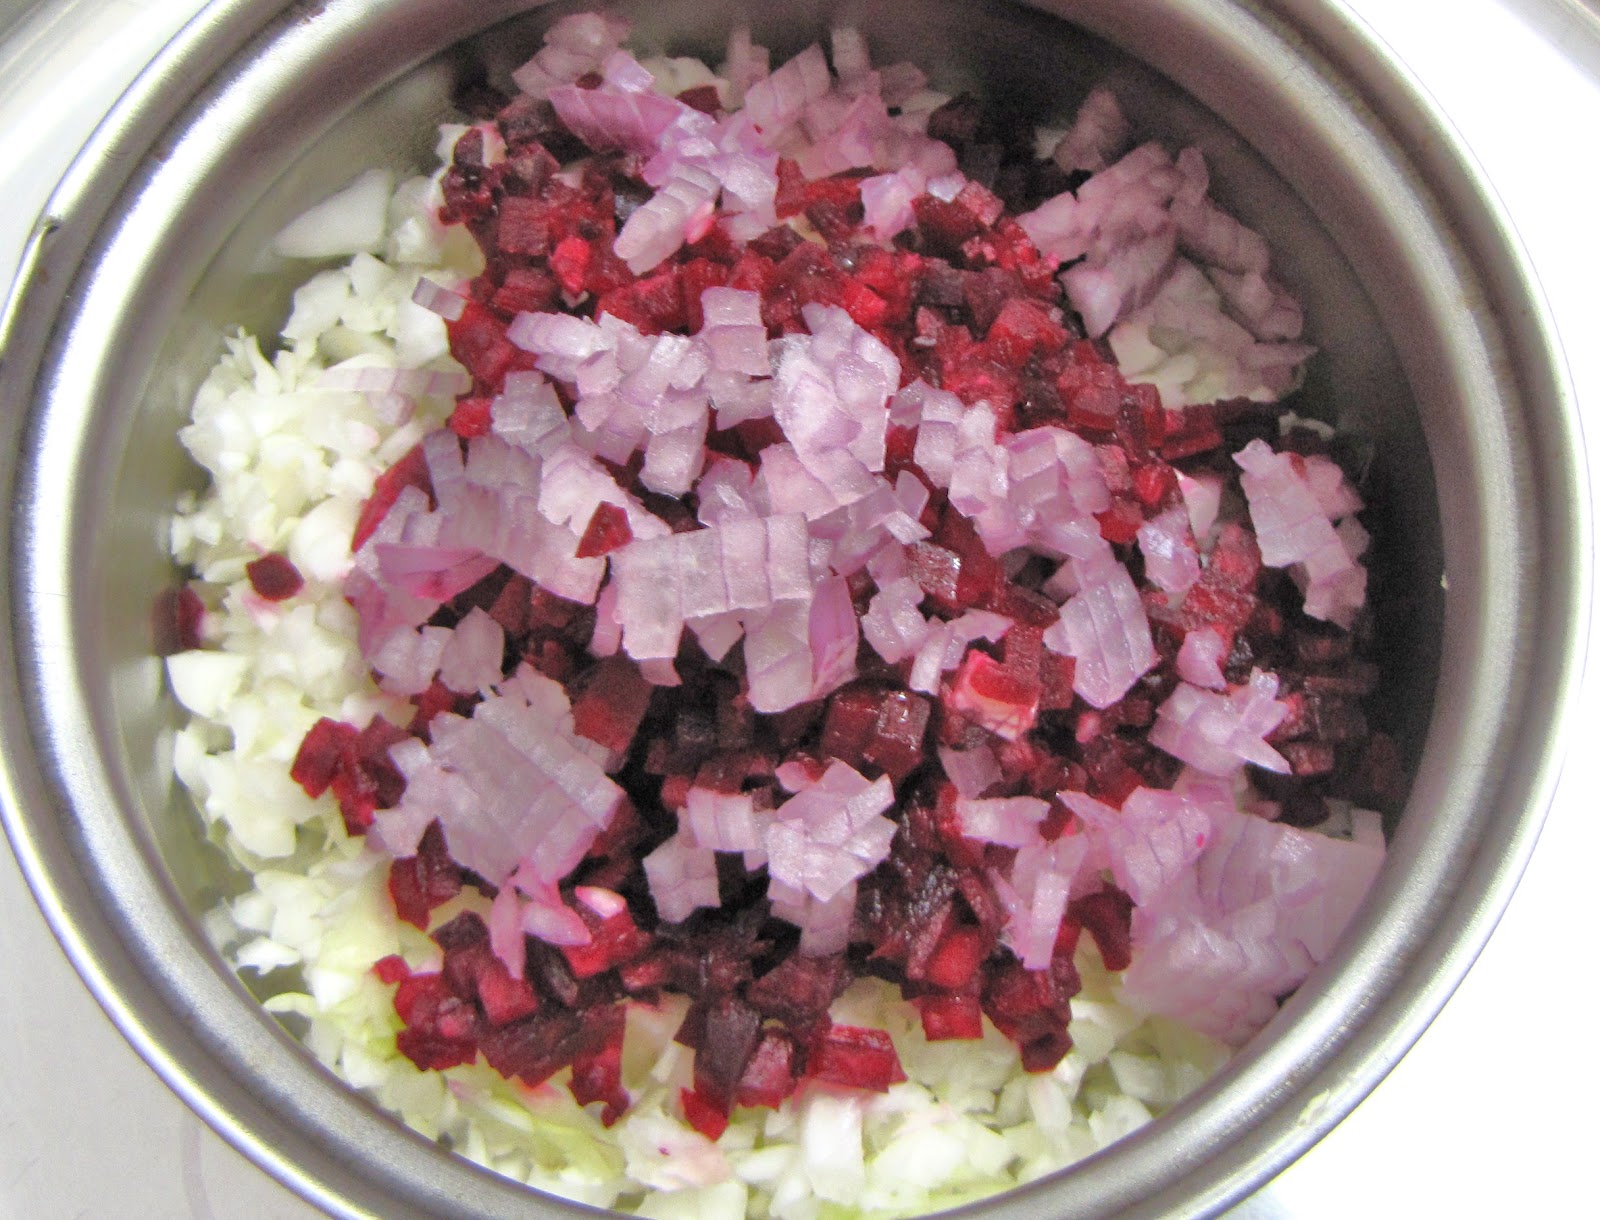
Step 1: Clean and wash the radish greens and then finely chop them.
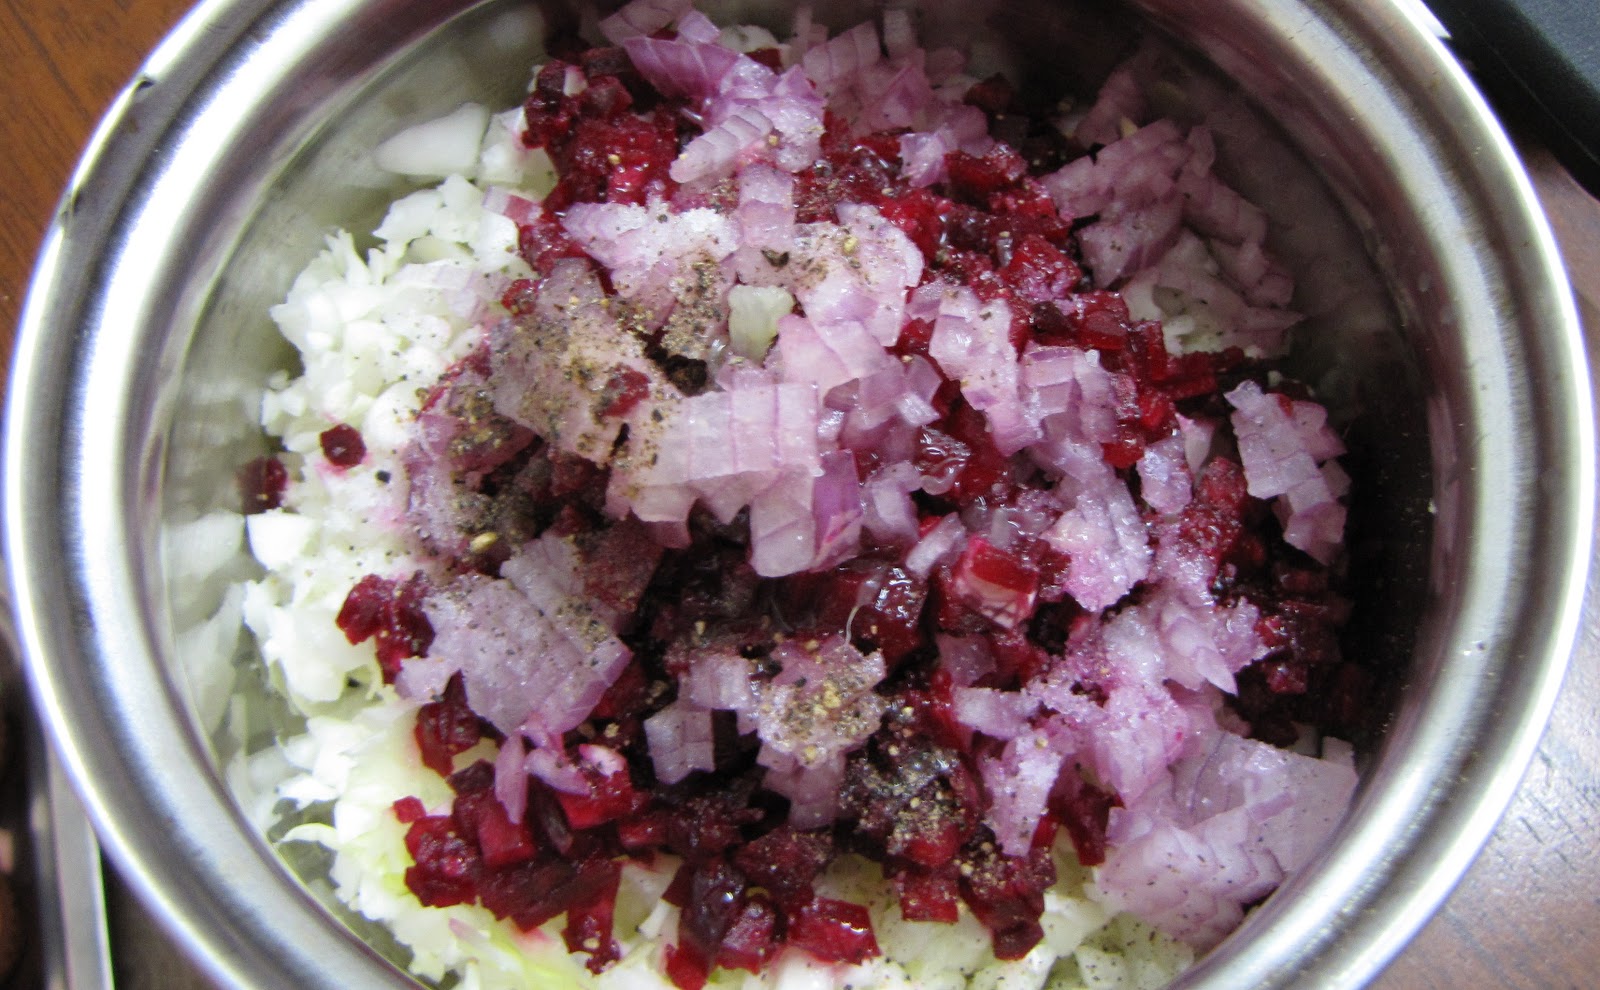
Step 2: Heat oil in a pan, crackle cumin seeds and carom seeds, sprinkle asafoetida and then add the chopped radish greens.
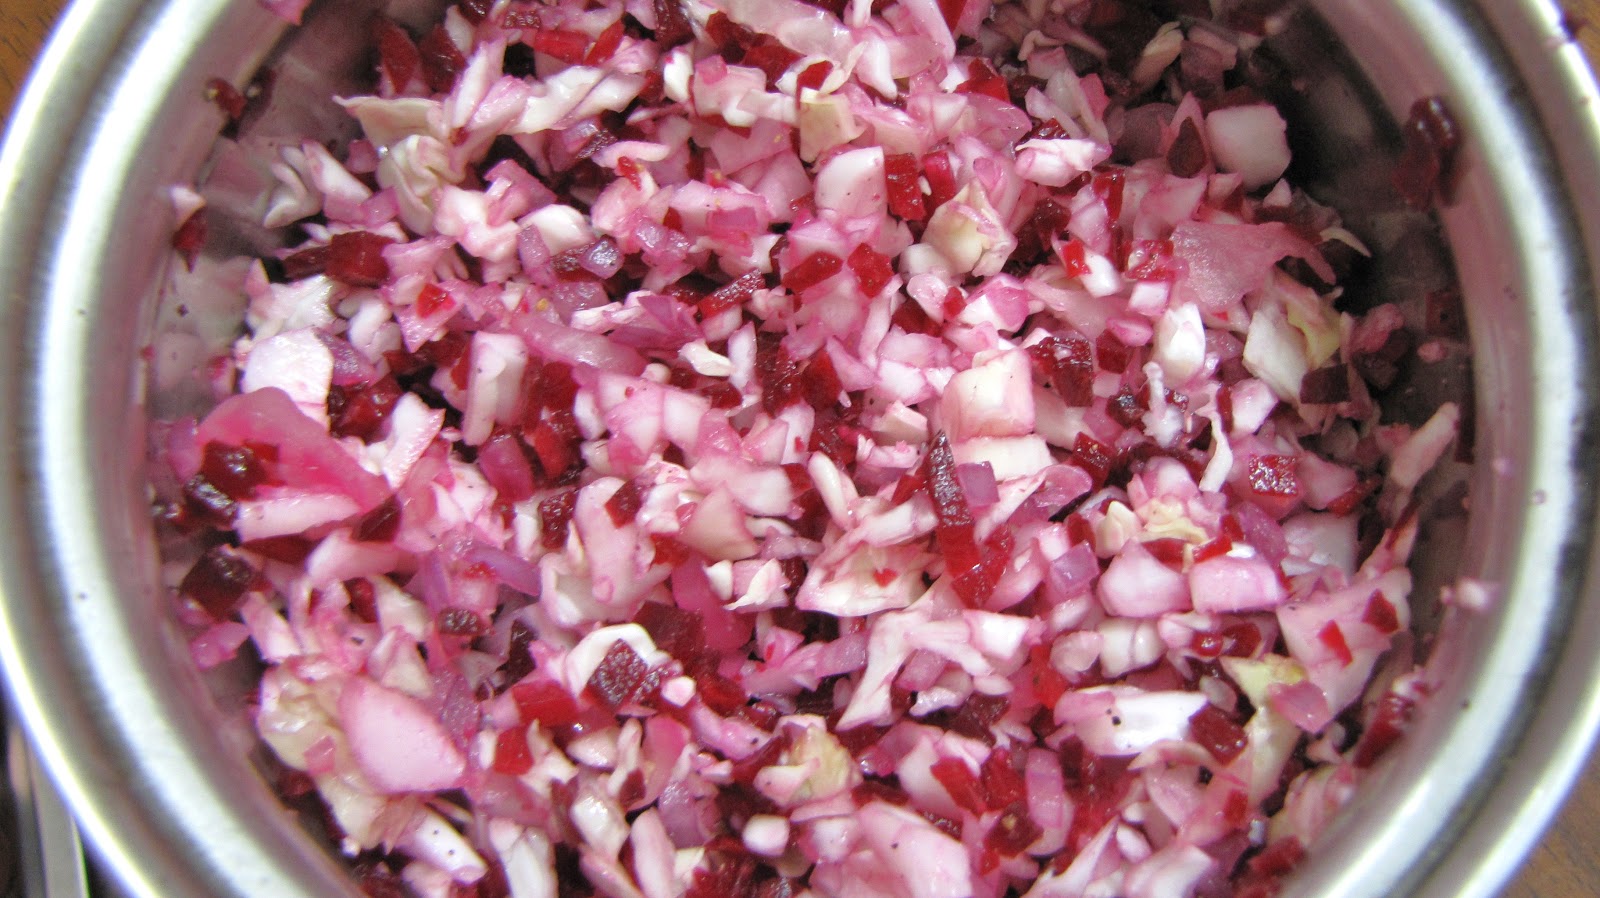
Step 3: Saute for a minute and then cover with a lid. Stirring occasionally, cook until the green is soft.
Step 4: Then add salt, chili powder and dry mango powder. Toss for another 2 minutes and switch off.
Step 5: Serve hot with bajra roti.

TIPS:
* I used dry mango powder as I went out of stock of tomatoes; I think that's used in the original recipe.  Using tomatoes gives it a moist texture and more tangy taste.
* Shredded jaggery is another superhit combo with bajra roti.
* Don't mistake the whitish pieces in the subji for onions, they are the baby radishes that came with the bunch of greens :)

Sunday, December 2

Simple fine salad


We had our lunch at Cholaiyil Sanjeevanam yesterday. I would say it was a heaven on plate, ok...plantain leaf; very wholesome it was :)
The Rajakeeyam, royal lunch started with five super shots namely 1. Dates juice 2. Nuts milkshake 3. Salted vegetable stock 4. Minted buttermilk 5. Flavored rice starch followed by several morsels of vegetables; uncooked, semi-cooked and fully cooked that included plantain stem, plantain flower, squash, pumpkin, green leafy vegetables and others. Then both steamed red rice and white rice were served with pureed dal, sambar, morkuzhambu, rasam and buttermilk along with paruppu payasam. The food served is said to be had in the same order of serving for best results ;) After you are done, they pour a spoon of honey into your palm that is said to help digestion and finally will be given a natural beeda along with the nominal bill of Rs.220 per Rajakeeyam lunch. Good lunch :) :) :)

Original recipe Source: Sanjeevanam restaurant

I tried something with this inspiration at home today for lunch but very few items relatively.

1. Beet root soup
2. Simple fine salad
3. Plantain stem raita
4. Steamed cabbage salad
5. Plain rice
6. Capsicum sambar
7. Roasted papad
8. Cumin flavored buttermilk

We both usually have max of 3 items (rice, vegetable, curry) for a meal. But it was so good to have many items in a single meal, its a balanced one, huh :)

In this post I share the simple fine salad that is not the imitation but the inspiration from rajakeeyam salad. I think they had mixed chopped cabbage, beet root, raw mango with some salt. So simple yet tasty. My version below:

Ingredients:

1. Cabbage - 1 cup finely chopped
2. Beetroot - 1/2 cup finely chopped
3. Onion - 1/4 cup finely chopped
4. Lemon - 1/2
5. Salt to taste
6. Pepper powder - 1 pinch

Method:

Step 1: Mix all the ingredients and serve chilled.


TIPS:
* You can also add vegetables like carrot, capsicum, etc.
* For more spicy salad, add finely chopped green chilies and season with cut coriander leaves.


Mooli Paratha

Mooli paratha is a very good option to use the radishes for people who do not like them in salads or subjis. Some people make stuffed parathas with radish and some saute the radish before adding but I make a simple  and hastle free version of mooli paratha that I've shared here.

Original recipe Source: No specific source

Ingredients:
1. Radish - 3 small
2. Green chilies - 2
3. Salt as required
4. Wheat flour - 2 1/2 cups
5. Carom seeds - 1/4 tsp
6. Oil - 1 tbsp
7. Butter - 3 tbsp (optional)

Method:
Step 1: Wash, peel and grate the radishes; add little salt and keep it covered for 5 minutes. 
Step 2: In a mixing bowl take wheat flour, salt, carom seeds, oil and  chopped green chilies.
Step 3: When you open the grated radish, you'll see the juice of radish has come out. Now, squeeze the juice in a cup tightly with your fist and add the dry grated radish into the mixing bowl. 
Step 4: Mix the dry ingredients well; then add the extracted radish juice to the dough and mix to get a soft dough. Keep aside for 10 minutes.
Step 5: Divide the dough into equal sized portions say 6 -8 in number. Roll them into flat circles with the help of dry flour.
Step 6: Heat the tawa, grease with some butter and roast one side of the paratha, when you see brown spot on it and bubbles on the other side flip to the other side and roast with some more butter. You can dry roast them or use oil or ghee. 
Step 7: Serve hot with pickle and curds.


TIPS:
* For me usually there would not be need for adding more water as the juice would give enough moisture. In case you use less radish relatively or if the radish that you use is dry, add some plain water.
* If the dough becomes too gummy add some more flour.

Monday, November 26

Besan Ladoo

This recipe is an adaptation from www.nishamadhulika.com. I had tried this recipe a couple of times earlier too but for Diwali I attempted this tried and tested recipe:)

Original recipe Source: Nishamadhulika.com

Ingredients:

1. Gram flour - 500 gm
2. Sugar - 500 gm
3. Ghee - 400 gm
4. Cashew nuts - 50 gm
5. Cardamom powder - 1 tsp

Method:

Step 1: The first step is to prepare bura. To prepare this, heat a heavy bottomed pan add sugar and half a cup of water and stir continuously. After about 10-15 minutes you'll feel the sugar solidifying on the outer rim; at this point switch off the heat and let it cool by stirring. On doing this for about 15 minutes you'll get sugary powder. This is just the dissolved and recrystallized sugar in a uniform and finer texture that we call bura.


Step 2: Roast broken cashew nuts with some ghee in  a heavy bottomed pan and keep it aside.
Step 3: In the same pan, melt the rest of the ghee in low heat and add gram flour to it and roast until aroma emanates and turns slightly brownish. Switch off the heat and let it cool a bit.


Step 4: Now in a big mixing tray or bowl, add bura, roasted gram flour cardamom powder, cashew nuts and mix thoroughly. The gram flour should be slightly warm to press ladoos.


Step 5: Take a ladle full of this mixture in your palm and press and roll continuously until you get a nice round ladoo. Repeat until the mixture is done.


Tips:
* If the ladoo is not staying in form, heat some more ghee and add to the mixture.
* You can use almonds instead of cashews.
* You can place whole nuts at the center of the ladoo or even press one at the top of it.

Butter Murukku


Butter murukku was the savoury at home for this Diwali. After some research I found that this is relatively an easy thing to attempt and not that it came out mind blowing. I learnt that sweets and savoury making is not just about the formula and procedure like baking, it is also about experience. What I missed this time was the texture and freshness of the rice flour; depending on their dryness and type of rice used the rice flour gets its traits which result in crispness, colour of the savoury, flavour, oil absorbing nature and stuff like that. I don't think there is any metric to determine these; we just got to use the experience or instincts. Usually what wise people do is try a small batch first and then repeat for the rest, so that there is room for correction if necessary. Oh, too much of gyan just because mine was screwed a bit (It was slightly hard); don’t worry; sometimes you just crack it at the first go. However, I’ve given modified measures here which finally rendered me good results.


Ingredients:

1. Rice flour - 4 cups
2. Roasted-gram flour - 1 cup
3. Urad dal flour - 1/2 cup
4. Butter - 2 tbsp
5. Salt as per taste
6. Carom seeds- 1 tsp
7. Sesame seeds - 1 tbsp
8. Oil for deep frying

Method:

Step 1: Sieve and mix all the flours in a mixing bowl, add salt, carom seeds, sesame seeds, softened butter, a tbsp of hot oil and mix well thoroughly. Then add warm water gradually and mix to make a soft dough. Wrap it in a muslin cloth and leave for 10 minutes.


Step 2: Heat oil in a deep pan; and in parallel with the help of murukku mold squeeze circular swirls with the desired size/shape/ number of holes in mold.


Step 3: When the oil in hot, simmer the heat and slide in the swirls very delicately and carefully into it. Once it  browns on one side, flip to the other side. Adjust  heat depending on the color you want and make sure it is cooked well.


TIPS:

* Usual mistakes in murkkus are that they turn out very dark in color or or they are brittle that they don't take the swirl shape or they are soft or they are too hard to bite or sometimes they absorb lot of oil. For each of these experienced people give suggestions and by that I mean I have not much idea :)

Plantain Cutlet

One of our friends had given some plantains which he got from his place. I had plenty of them and so wanted to try something other than the fry. Cutlet was a nice idea... I tried the recipe with a meal maker twist.


Ingredients:
1. Plantain - 2
2. Meal maker - 1 cup (Alternately you can replace boiled & mashed potatoes)
3. Onion - 1 finely chopped
4. Green chilies - 2 finely chopped
5. Corn flour - 2 tbsp
6. Cumin powder - 1 tsp
7. Lemon - 1
7. Salt as per taste
8. Chili powder - 1/4 tsp
9. Oil as required
10. Bread crumbs - 1/2 cup

Method:

Step 1: Steam cook the plantains, peel and mash them.
Step 2: Soak the meal makers in salted boiling water for 5 min, squeeze out water and grind in a mixer.
Step 3: Mix mashed plantains, ground meal makers, chopped onion & chilies, salt, cumin powder, chili powder and squeeze juice of a lemon and mix well.
Step 4: Divide into medium sized portions and pat into desired shapes (I used cookie cutter). Ready all the portions similarly.
Step 5: Heat tawa, grease oil, take a cutlet toss on the both sides to smear bread crumbs and place delicately onto the hot tawa. You can make around 6 in single go.
Step 6: When one side is browned, with a flat spatula, flip cutlets to the other side and drizzle a few drops of oil. Slightly press on the top of each cutlet to make them touch the surface of the tawa in order to brown evenly.
Step 7: When done, draw them to the plate and relish with sauce of your choice and onion salad if preferred.

Tuesday, October 23

Sweet Atta Paddu

I really don’t know what to call this. I wanted to do a savory and sweet for aayutha pooja and punjabi puda inspired from dassana was the sweet I tried; but it totally took a different form later during my trial; hence I named it paddu.

Original recipe Source: vegrecipesofindia.com

Ingredients:
1.       Wheat flour -1 cup
2.       Semolina – 2 tbsp
3.       Salt – 1 pinch
4.       Jaggery/ Sugar – ½ cup
5.       Fennel seeds – 1 tbsp
6.       Raisins – 2 tbsp
7.       Ghee – 1 tbsp
8.       Oil to fry

Method:
Step 1: Mix all ingredients from 1-7 in a bowl using water to a pakora batter consistency.


Step 2: Heat oil in the pan and spoon batter into it, few at a time.


Step 3: Alternatively you can prepare them in a kuzhiyappakal shown in the picture if you have one or use tawa to prepare them like pancakes.


Idli Batter Bonda

My granny used to prepare this instant snack when we come back from school. I don't know if she learnt this recipe from someone, but there seems a widely practiced recipe called 'punugulu' in Andhra which is the same as what my granny used to make. These are tasty, crispy and quick snacks for rainy days and unexpected guests.

Ingredients:

1.       Idli batter – 1 cup
2.       Onion – 1 cup finely chopped
3.       Green chilies – 2 finely chopped
4.       Asafoetida – 1 pinch
5.       Baking soda – 1 pinch
6.       Salt as required
7.       Oil for deep frying


Method:

Step 1: Take idli batter in a bowl and mix with it all the ingredients except oil.
Step 2: Heat oil in a deep kadai.
Step 3: Now, either with spoon or with your hand pour around 6-8 small portions of  
           batter in hot oil and fry them on both sides until golden brown.
Step 4: Drain oil and take out the bondas and repeat until entire batter is over.
Step 5: Serve hot with green chutney or coconut chutney.

Monday, October 22

Manathakkali keerai paal kootu

Akkama, my granny used to say that this particular green vegetable is so very soothing for stomach ulcers and mouth ulcers. She had prepared it every fortnight for us when we grew up.

Ingredients:

1.       Black nightshade leaves (Manathakkali keerai) – 1 bunch, cleaned and chopped
2.       Moong dal – ¼ cup
3.       Milk – ½ cup
4.       Rice flour – 1 tbsp
5.       Salt as per taste
6.       Sugar – ½ tsp

Tempering:
1.       Ghee – ½ tbsp.
2.       Pepper – ½ tsp crushed
3.       Red chili – 1 halved

Method:
Step 1: In a pan boil moong dal (It is better if you soak 15 minutes before cooking); when it is half done add green leaves to it and cover to cook.
Step 2: When it once done add milk, rice flour and stir for 2 minute until milk thickens
Step 3: Sprinkle salt, sugar, mix well and turn off heat.
Step 4: For tempering in a tadka pan, heat ghee add halved red chili, crushed pepper and empty it over the dish and serve hot with stead rice.


Lauki Muthiya

I have adopted this recipe from nishamadhulika.com.  Bottle gourd is a pathetic vegetable that never gets standing votes in the house holds though this is a worshiped vegetable in Ayurvedha. Nevertheless  this is a versatile vegetable with which we can make different courses from soups to desserts. Muthiya or Mukhia means fistful; this dish is shaped with the fist and hence the name; these steamed and spiced dish can be had both as snack or tiffin.

Ingredients:
1.       Bottle gourd – 1 grated
2.       Wheat flour – 1 cup
3.       Bengal gram flour – ½ cup
4.       Semolina – ½ cup
5.       Green chilies – 1 tbsp finely chopped
6.       Ginger – ½ tbsp grated
7.       Coriander – 2 tbsp finely chopped
8.       Red chili powder – 1 tsp
9.       Coriander powder – 1 tbsp
10.   Salt as per taste
11.   Turmeric powder – 1 tsp
12.   Baking soda – 1 tsp
13.   Oil – 2 tbsp

For seasoning:
14.   Oil - 1 tbsp
15.   Mustard seeds – 1 tsp
16.   Cumin seeds – 1 tsp
17.   Sesame seeds – 1 tbsp
18.   Curry leaves – 1 sprig
19.   Salt as per taste
20.   Coriander powder
21.   Red chili powder – 1 tsp
22.   Grated ginger – 1 tsp
23.   Chopped green chilies – ½ tbsp
24.   Dry mango powder – 1 tsp
25.   Coriander – 2 tbsp finely chopped

Method:

Step 1: Get the steamer ready on stove with water in it. Add all the ingredients from 1-13 and mix thoroughly; you should be able to make oblong shapes out of them. Do not add water, the juice of bottle gourd should be sufficient, if the dough is sticky or too watery, add more wheat flour to get the right consistency. You can add little water if required.


Step 2:  Form oblong shapes from the dough and steam cook them for 10 minutes. Verify if they are done with a toothpick or knife.


Step 3: Let them cool for some time. Cut them into ½” slices


Step 4: Now in non-stick pan heat oil, add mustard seeds, cumin seeds and sesame seeds, curry leaves and let them crackle. Add chillies and ginger and sauté for a minute.


Step 5: Simmer the heat and add all dry ingredients; beware not to burn them. Toss the sliced muthias along with coriander.
Step 6: Serve hot as a snack or tiffin.


Banana Walnut Milkshake

Walnuts are brain foods and are the main source of Omega-3 fatty acids especially for vegetarians. As a nut, unlike cashew or almonds, they are not very pleasant tasting as it is full of oil. Generally it is consumed in baked dishes and enhanced with banana flavour. With the same combo, I tried this banana-walnut milkshake.


Ingredients:

1.       Milk – 2 cups
2.       Walnuts – 4 + 2
3.       Banana – 2
4.       Sugar – 2 tbsp

Method:

Step 1: Peel and slice the bananas; mash them in a mixer jar along with the sugar
Step 2: Pour milk into the bananas and whip it for few seconds.
Step 3: Now crush the walnuts and add into the jar and whip for one final time.
Step 4: Fold the shake into two glasses and chill it covered.
Step 5: Garnish with whole walnuts before serving.

Dal Tadka

Dal tadka is the seasoned lentil soup used as an accompaniment with steamed rice. This is a comfort food for most north Indians and are kid friendly. My 2 years old niece loves it and we were overwhelmed to see her eat something with enthusiasm. It is simple, healthy and yummy; it goes well with any dry subji or papad or even pickle.


Ingredients:

1.       Tuvar dal – 1 cup
2.       Moong dal – ¼ cup
3.       Turmeric powder – 1/2 tsp
4.       Salt as per taste
5.       Ghee – 1 tbsp
6.       Asafoetida – 1 pinch
7.       Cumin seeds – 1 tsp
8.       Dry chilies – 2
9.       Kasoori methi – 1 tbsp
10.   Curry leaves – 1 sprig

Method:

Step 1: Wash and pressure cook the dals with some salt and turmeric.
Step 2: Heat ghee in a pan and splutter cumin seeds in it, sprinkle asafoetida, add broken dry chilies and kasoori methi and curry leaves.
Step 3: Add dal to the tadka and mix water depending on consistency required; adjust salt, spice and boil for 1 minute. Turn off heat.
Step 4: Squeeze lemon and serve hot with rotis or rice.

Broken Rice Upma

This is my favorite tiffin from my childhood; this is one of those never satiating foods that we love to have from our mom's kitchen. Another unique thing about this upma is, it is made from 'upma kappi' which is broken rice; I have never seen this in stores, it is home made or mom-sent. It is a staple in our home and a comfort food for everyone. My paternal grandpa used to say, 'Ponni rice is born to take the form the upma kappi' meaning that upma kappi made of ponni rice (a variety of rice) is best suited for upmas.

Ingredients:

1. Broken rice - 2 cups
2. Carrot - 2
3. Onion - 2
4. Green peas - 1 fistful
5. Corn kernels - 1 fistful
6. Green chilies - 2
7. Curry leaves - 1 sprig
8. Water - 4 cups
9. Oil - 3 tbsp
10. Mustard seeds - 1 tsp
11. Urad dal - 1 tbsp
12. Bengal gram - 1 tbsp
13. Asafoetida - 1/4 tsp

Method:

Step 1: Wash the vegetables; chop the onion, carrot and green chilies.


Step 2: Heat a kadai, temper with mustard seeds, urad dal, bengal gram, asafoetida, curry leaves, green chilies and saute onion in that until translucent.

Step 3: Heat measured water with salt in another stove in parallel.

Step 4: Add carrot to the kadai and saute for 2 minutes, roast the broken rice along with the vegetables for 2 more minutes.


Step 5: Pour the hot water and close with a lid immediately; simmer the stove.

Step 6: After 5 minutes open the lid, add peas and corn and stir well.

Step 7: If uncooked and dry, sprinkle some water. Adjust salt and close the lid again for 5 minutes.


Step 8: Open stir well and switch off stove. If you prefer 'kandal', slightly burnt upma forming a thick bottom layer; keep in simmer for 5 more minutes.

Step 9: Serve hot with coconut chutney or idli podi or curds. Jaggery or sugar also goes well with this upma.


Sunday, October 21

Sabudana Kitchadi

Like idly-sambar is for south-Indians, sabudana kitchadi is for maharastrians. Once a colleague of mine Roselin brought this to office, that was the first time I tasted it, loved it and I learnt to prepare this from her. Until I dug into the web, I thought sabudana is no healthy ingredient and had a dumb taste but for the condiments used to prepare it. But the internet lit upon me the goodness of these tiny pearls. Sabudana is made of tapioca and is non-gluttonous and very very healthy and cooling to the body. In olden days sabudana or sago was made in cottage industries and were mostly unhygienic which is another reason we at home used to avoid it for, but now with industrial manufacturing in place this is not an issue; so all of us can happily relish it.  I would call this a wholesome breakfast as this is full of multi-nutrients. 


Ingredients:

1.       Sabudana – 1 cup
2.       Potato – 2
3.       Peanuts – 1/3 cup
4.       Mustard seeds – ½ tsp
5.       Cumin seeds – ¼ tsp
6.       Green chilies – 2 chopped
7.       Curry leaves -1 sprig
8.       Asafoetida -1 pinch
9.       Salt as per taste
10.   Oil – 1 tbsp

Method:

Step 1: Soak the sabudana in water for 30 minutes, then drain the water and leave it covered overnight. Some people leave it soaked in water the whole night and others soak just for 2 hours; it depends upon the type of sabudana grains you use. Just make sure they neither get dissolved nor are hard in the centre.


Step 2: Dry roast the peanuts, let it cool for some time and then grind it coarsely in the mixer.
Step 3: Wash, peel and cut the potatoes into small cubes.
Step 4: In a non-stick pan, heat oil, splutter mustard & cumin, sprinkle asafoetida, add curry leaves & green chillies and then sauté the cubed potatoes in it with some salt until they are done.


Step 5: Now add the sabudana, peanut powder, salt and mix with light hand so as to not mash the Kitchadi.
Step 6: Once mixed well, turn off stove immediately; not much cooking is required; else sabudana would become lumpy.
Step 7: Serve hot with curds if necessary. Actually this goes best without any accompaniment.


Humble Risotto

Risotto is a kind of Italian dish prepared with starchy rice varieties, mostly arborio. It is usually cooked to a creamy texture using vegetable or meat stock and then spiced as per need. You get only imported arborio in India; I used local brown rice which is also short grained and starchy, even the normal idli rice should work. Yeah, it may not taste ditto like arborio risottos because I'm translating it and not transliterating :)

Ingredients:
1.       Brown rice – 1 cup
2.       Butter – 1 blob
3.       Onion – 1 chopped finely
4.       Tomato – 1 chopped finely
5.       Vegetable stock – 3 cups
6.       Pepper powder – 1 tsp
7.       Italian seasoning – 1 tsp
8.       Salt as per taste
9.       Mint to garnish
10.   Fresh cream or grated cheese (optional)

Method:

Step 1: Heat butter in a non-stick pan, sauté onion in that and then roast the brown rice in that. Boil the stock in parallel, we’ll use them periodically.


Step 2: Add stock to the rice to the level the rice just submerges and cover it. Sprinkle required salt. Stir occasionally.


Step 3: Once the water is absorbed, add some more stock to cover the rice and let it cook. Add in chopped tomatoes. Repeat adding stock, until it is fully done. Slow cooking is the essence of risotto, it takes about 45 minutes.
Step 4: Sprinkle seasoning, pepper and add cream/cheese if using and stir well. Adjust salt.


Step 5: Garnish with mint leaves and serve hot.


Wednesday, October 17

Beetroot Soup

Beetroot has a lot of health benefits like lowering blood pressure & cholesterol, it is said to produce anti-oxidants and they call it enemy of colon cancer. But for me I simply love the color of beetroot. Soup is one very nice way of relishing beetroot. Here, I share my simple version of beet soup that serves two people.

Ingredients:
1. Beetroot - 1
2. Tomato -1
3. Salt to taste
4. Pepper to taste

Method:
Step 1: Blanch the roughly chopped beetroot and tomato in a cup of water for 3 minutes.
Step 2: Let it cool a bit and then blend together finely in a mixer jar.
Step 3: Add required salt and pepper.
Step 4: Serve warm or heat it to have it hot or refrigerate to have it cool. 


TIPS:
*This is the simplest version. You can try one of the alternate options as mentioned below
*Skip tomato and add juice of lemon
*Saute in some butter or olive oil instead of blanching beetroot
*Add more herbs & seasoning
*Add more vegetables and top it with caramelized onion.


Friday, October 12

Paneer Bhurji

Paneer Bhurji
I first ate this dish from the Punjabi family I stayed with as paying guest. I fell in love with it the first time I ate it and so did Kundan; so I make this bhurji frequently at home. It is very simple to make and is one of the tastiest combination with phulkas, I swear.


Ingredients:

1.       Paneer –200 gm
2.       Green chilies – 2
3.       Onion – 1 finely chopped
4.       Cumin seeds – ½  tsp
5.       Asafoetida – 1 pinch
6.       Oil 1 tbsp
7.       Salt to taste
8.       Chopped Coriander – 1 tbsp

Method:

Step 1: Grate the paneer either by using whipping option in the mixer or by crumbling by your hands
Step 2: In a non-stick pan, heat oil and crackle cumin seeds in it, sprinkle asafoetida, thrown in chopped chilies, add the chopped onion and sauté till they are soft and translucent.
Step 3: Now, add the grated or crumbled paneer, sprinkle necessary salt over it and mix with a soft hand in simmered stove for 1 minute.
Step 4: Adjust salt, garnish with the fresh coriander and serve warm with rotis/ phulkas.
Tip:
Ø  I make use of homemade paneer to do bhurji as they are crumbly; the store bought paneer are little rubbery is what I feel.
Ø  You can use old paneer (not after expiry) in freezer which are dry in texture, for this dish.

Paneer Capsicum Chinese Gravy

I found this simple recipe on the Szechuan sauce bottle I got last week and tried this easy-peasy dish. Believe me, except for the looks of the dish, it did come closer to a restaurant gravy in terms of taste, flavor  and consistency. It goes very well with fried rice.

Ingredients:

1.       Capsicum – 1 large
2.       Paneer – 100 grams
3.       Onion – 1 large
4.       Szechuan sauce – 1 tbsp
5.       Garlic cloves – 3
6.       Dry chilies -2
7.       Spring onion chopped – 2 tbsp (for garnishing)
8.       Gingelly oil – 1 tbsp
9.       Soy sauce – 1 tbsp
10.   Vinegar – 1 tbsp
11.   Corn flour – 1 tbsp
12.   Salt as per taste

Method:

Step 1: Cut the capsicum and onion into 1.5” square and paneer into 1” cubes.
Step 2: Heat oil add grated onion and broken chilies to it, add cut vegetables and paneer and sauté for a minute or so
Step 3: Add Szechuan sauce and dilute it with 2 cups water. Now separately dissolve the corn flour in some water and stir into the gravy until it thickens.
Step 4: Add soy sauce, vinegar, salt and stir for a minute more
Step 5: Garnish with chopped spring onions and serve hot with fried rice.


TIPS:
·        * You can shallow fry the vegetables and paneer and keep them aside and add at the last to retain its crisp and color.
*     * I've used home made panner which was a little gooey that is why it has dissolved on sides.

Kanjeepuram Idly

The other day, Priya my neighbor had given this recipe of a traditional dish called 'Kanjeepuram idly', a soft white mildly spiced idly which I really liked. Thank you Priya for sharing your paati's recipe. Later, I learnt from my mother in law that, in her mother's place they have a practice of making a special type of idli on diwali called 'Maraka idly' which shares the batter recipe with the kanjeepuram idli. The interesting part about maraka idlis is that these giant idlis are prepared in large bronze pot shaped vessels, with the help of big muslin cloth in which the batter is poured and steamed. ' However, the seasoning for kanjeepuram idly is so aromatic while maraka idli has a usual tadka. For me, practically kanjeepuram idli is what I prefer.
Ingredients:

1.       Raw rice – 1 cup
2.       Boiled rice – 1 cup (preferably idly rice)
3.       Urad dal – 1 cup
4.       Gheel – 2 tbsp
5.       Cumin seeds – 1 tsp
6.       Crushed pepper – 1 tsp
7.       Dry ginger powder – 1 tsp
8.       Curry leaves – 1 sprig
9.       Salt as per taste
10.   Baking soda – ½ tsp

Method:
Step 1: Wash and soak rice (both the rice together) and dal separately for 2 hours. Grind the dal with enough water first and then the rice. Mix thoroughly both the batter together with salt to in pouring consistency. Leave this overnight for fermenting.


Step 2: Grease dhokla plates or large circular plates with oil to make short cylindrical idlis. Heat water in the steamer or idli pot.
Step 3: Now, heat ghee in a tadka pan, splutter cumin seeds, add crushed pepper & dry ginger powder and throw in curry leaves. Be careful not to burn the tadka.


Step 4: Put the tadka over the batter and mix well. Add the baking soda and mix well again.


Step 5: Pour the batter in the greased plates and steam them immediately. It takes 5-15 minutes depending on the thickness of the plates.