Monday, January 30

Pitta Bread Sandwich


I first saw these pocket breads in some TV show and liked its look appeal. Since then, I’ve been wanting to prepare this but in the local store I could not procure yeast; then one day when I got to buy some active yeast, I was more than excited to try it out. This turned out very fine and we just loved it.


Ingredients:

1. Wheat flour - 2 cups
2. Yeast - 1 tbsp
3. Salt to taste
4. Tomato slices - 6
5. Onion slices - 6
6. Boiled chickpeas - 1/2 cup
7. Cabbage - 1 cup shredded
8. Cheese spread or mayonese - 4 tbsp
9. Mint - few sprigs
10. Crushed pepper - 1 tsp

Method:

Step 1: Mix atta with yeast, salt and water and leave aside for an hour
Step 2: Roll into roti like breads (slightly thicker) and roast on tawa; they will puff fully. Cut them into halves to get semi-circular pockets.
Step 3: T make the sandwich, just stuff the pitta pockets with tomato slices, onion slices, few salted & boiled chickpeas, cabbage juliennes, smear some cheese spread or mayo and sprinkle salt and pepper.
Step 4: Garnish with mint leaves and serve.

Paneer Fried Rice

I am very fond of fried rice and have always wanted to try the restaurant style fried rice at home and now it happened. I had tried the simplest version and there are some more variants. Something I learnt for the first time is, in restaurants they cook the rice previous day and refrigerate it to get that non-sticky crisp form. Though I made paneer fried rice, veg fried rice just a subset of paneer fried rice or in other words Veg fried rice + Grated paneer = Paneer fried rice J


Ingredients:


1.       Pre-cooked basmati rice – 2 cups
2.       Carrot – ½ cup finely chopped
3.       Bush beans – ½ cup finely chopped
4.       Spring onion – 1 bunch (green and white part chopped separately)
5.       Grated paneer – ¾ cup
6.       Oil – 2 tbsp
7.       Vinegar – 1 tsp
8.       Pepper crushed – 1 tsp
9.       Salt to taste

Method:


Step 1: Heat oil in a wide pan and sauté white part of spring onion in that, add carrot and beans and sauté in high heat for a minute.


Step 2: Sprinkle salt, pepper and drizzle vinegar. Keep tossing.
Step 3: Add spring onion and paneer and toss well.


Step 4: Now add cooked rice with more salt as required and adjust vinegar and pepper. Toss in high heat until the rice gets heated up.


Step 5: Serve hot with gravies or sauce.


Matri

Though matri is a common snack in north India all round the year, during Diwali every other household prepares this crispy, flat, round, deep fried savory either bland or spiced. Matri is traditionally prepared from maida but due to its glutenous nature wheat flour and bengal gram flour are also used. One can see in the market galis of Delhi, the displayed tins of several variants of matris outside the shops. People buy it like groceries in kilos as matris have a very long shelf life; customers pick their choice by tasting them for spice and breaking them to ensure freshness.

Ingredients:

1. Maida - 1 cup
2. Atta - 1/2 cup
3. Salt as per taste
4. Baking Soda - 1tsp
5. Carom seeds - 1 tbsp
6. Ghee - 2 spoon
7. Oil for frying

Method:

Step 1: Add all said ingredients except oil and mix into a soft but stiff dough with warm water.
Step 2: Leave the dough to sit aside for 30 minutes.
Step 3: Roll into large roti like circles not too thin and prick with a fork on the surface of circles, this prevents matries from puffing.
Step 4: Cut them into small circles with a bottle lid or cookie cutter.
Step 5: Deep fry them in simmered stove to get crispy matris. Crispier the matri, longer its shelf life. Let it cool down before stocking in air tight containers.
Step 6: Serve with pickles or salsa or raita along with hot tea.

Gobi Muthiya

Gobi muthia is a Gujrathi tiffin item prepared with cabbage. Muthias are generally steamed though they can be deep fried for crispy snacks. We get to enjoy the cholesterol lowering benefits and cancer prevention properties that are obtained only on steam cooking cabbage. This is an appetizing dish for those who do not like cabbage very much.

Ingredients:

1. Cabbage - 1/2 head
2. Bengal gram flour - 2 tbsp
3. Ginger - 1 tsp grated
4. Fennel seeds powder - 1/2 tsp
5. Cumin powder- 1 tsp
6. Green Chillies - 1/2 tbsp finely chopped
7. Coriander - 1 tbsp chopped
8. Oil as required
9. Mustard seeds - 1 tsp
10. Seasame seeds - 1/2 tbsp
10. Asafoetida - 1 pinch
11. Curry leaves - 1 sprig

Method:

Step 1: Wash and chop cabbage;  sprinkle some salt over it and keep it closed for 10 minutes. This leaves out water and makes the cabbage soft.
Step 2: Mix the flour to give binding to the dough.
Step 3: Add chopped chilies, cumin powder, fennel seeds powder, ginger and coriander and mix the dough well. Add few drops of water if required to get it to a moldable consistency.
Step 4: This dough can be rolled into small oblong shapes and steamed in steamers or idli cookers.
Step 5: To season the steamed muthias: Chop the muthias into bite sized portions; heat oil, splutter mustard seeds, seasame seeds, asafoetida, curry leaves and toss the muthia pieces into the tempering.
Step 6: Garnish with coriander and serve hot plain or with green chutney.

Capsicum Rice


Capsicum rice is one of my success dishes as a beginner that some people have even mapped me to my capsicum rice in their minds. It is simple mixed rice suitable for preparing and packing hours earlier to consuming; however, just the ingredient list is a little longer though they are basic ones available at home. Capsicum’s flavour is aroused with other blended spices and imbued in the rice.


Serves: 2
Preparation Time: 10 min
Cooking Time: 10 min (Excluding time for steaming the rice)

Ingredients:

1.      Capsicum - 2
2.      Oil – 1 tbsp
3.      Mustard – ½ tsp
4.      Urad dal – ½ tbsp
5.      Asafoetida – 1 pinch
6.      Curry leaves – 1 spring
7.      Steamed rice – 3 cups
8.      Ghee – 1 tbsp

For Masala:
1.      Ghee – 1 tsp
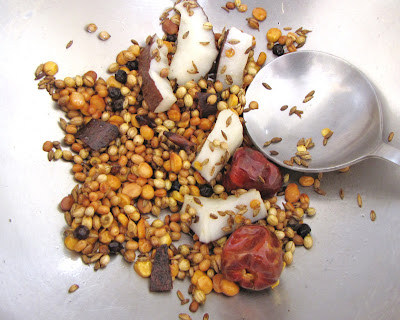
2.      Cumin seeds – 1 tsp
3.      Pepper corns – ½ tsp
4.      Coriander seeds – 1 tsp
5.      Urad dal – 1 tbsp
6.      Bengal gram – 1 tbsp
7.      Cinnamon – 1” piece
8.      Cloves – 2
9.      Red chillies – 2
10.  Coconut - 2” piece


Method:

Step 1: For masala heat the pan, roast the ingredients separately (if preparing for larger scale) or together with a tsp of ghee until crisp and aromatic. Be sure not to burn them; grind them in a mixer and keep aside.


Step 2: Heat oil in a tawa and season with mustard, urad dal, curry leaves and asafoetida (if you prefer add some Bengal gram & Urad dal to tempering also)
Step 3: Add the chopped capsicum and sauté for 2-3 minutes so that it gets cooked but not deformed.


Step 4: Then add the ground masala mix & salt and roast for one more minute.


Step 5: Slowly add the cooked rice into the pan, drizzle some ghee and mix well. Turn off stove. Adjust salt.


Step 6: Serve with raita or plain curds.


Saturday, January 28

Paneer Paratha

Paneer paratha is made with the cottage cheese or the Indian cheese; I usually prepare paneer at home. I prefer to prepare crumbled paneer dishes such as koftas, bhurjis, paneer parathas with home made paneer. I had my first and best Paneer paratha in the Punjabi household where I stayed as a paying guest. Punjab is where the recipe originated and I was gifted to learn it from the authentic source itself.

Ingredients:

1. Paneer grated - 1 cup
2. Onion - 1/2 cup finely chopped
3. Green chilies - 2 finely chopped
4. Chaat masala - 1 tsp
5. Coriander - 2 tbsp finely chopped
6. Wheat flour - 2 cups
7. Salt as required.
8. Oil - 1 tbsp
9. Carom seeds - 1/4 tsp
10. Butter as required for preparing parathas

Method:

Step 1: Knead wheat flour, carom seeds, oil, salt and make a soft dough, slightly  more moist than phulka dough. 
Step 2: Mix the grated paneer, onion, green chilies, chaat masala, coriander and salt in a bowl.
Step 3: Take a 50 gm portion of dough, roll into ball and flatten with a rolling pin as a palm sized circle with edges thin and center thick.
Step 4: Grease the center with some oil and keep a big spoon of paneer mix in and cover it with the edges like a stuffed dumpling. 


Step 5: Now by dusting some dry flour on to it roll it into a paratha, make it flatter until it doesn't get torn.
Step 6: Grease butter on a heated tawa and prepare the parathas on both sides.


Rajma Masala

Rajma masala and steamed rice is a super dooper combo that every north Indian adores; however, rajma is from Mexican origin. This is suitable for parties or potlucks or lunch boxes and unlike most special dishes this is a hassle free, healthy, easy for digestion and eat-it-anyway dish (you can eat it like a lentil soup or with rotis or with rice or even as dip or spread). This is one such dish which when you try once you'll keep repeating often.


Ingredients:

1. Rajma - 1 cup
2. Tomato - 3
3. Onion - 1
4. Butter/ Oil - 1 tbsp
5. Bay leaf -1
6. Cumin seeds - 1 tsp
7. Asafoetida - 1 pinch
8. Ginger - 2" cut into long thin slices
9. Green chili - 1
10. Red chili powder - 1 tsp
11. Coriander powder - 2 tsp
12. Garam masala - 1 tsp
13. Lemon - 1
14. Coriander for garnishing.


Method:

Step 1: Wash and soak rajma overnight. With some salt pressure cook the rajma approx for 3 whistles until soft but not mushy.
Step 2: Puree tomato and green chili into fine paste.
Step 3: Heat butter or oil in a pan, add bay leaf to it, crackle cumin seeds, sprinkle asafoetida, add sliced ginger and saute the finely chopped onion in it.
Step 4: Once the onion becomes translucent, add the pureed tomato paste and saute until oil separates.
Step 5: Add the cooked rajma into the masala, add chili powder, coriander powder, garam masala and add water as per consistency.
Step 6: Adjust salt and spices and simmer for 5 minutes and turn off heat.
Step 7: Squeeze juice of a lemon, garnish with chopped coriander and serve hot with rice.


Friday, January 27

Alfredo Sauce Pasta

Alfredo sauce is from Italian origin; white creamy sauce got by mixing melted cheese, butter and flour; this is used to coat the cooked pasta along with some spices. Though this sauce is simple to make, it is also available in processed ready-to-eat forms that can be bought, mixed with cooked pasta and consumed. They are yummy but dairy rich and high in calories though.

Ingredients:

1. Pasta - 2 cups
2. Butter - 2 tbsp
3. Corn flour - 1 tbsp
4. Milk - 1 cup
5. Parmesan cheese - 3 tbsp
6. Salt and pepper
7. Garlic - 3 cloves

Method:

Step 1: Cook the pasta as per the instructions on the cover with some salt. Drain the excess water and toss with a few drops of oil.


Step 2: Melt butter over low heat in wide sauce pan and saute peeled and grated garlic in it.


Step 3: Stir in flour and mix with a ladle until blended.


Step 4: Slowly add milk to pan, keep stirring to avoid lumps.
Step 5: When the ingredients got mixed well, increase heat and reduce for 5 minutes to thicken the sauce.
Step 6: Adjust consistency, if sauce is too thick, add more milk; if it is too thin, add more diluted flour.
Step 7: Add the pasta, and cover with grated cheese.


Step 8: Adjust salt and sprinkle pepper as per taste.


• Serve immediately.


Thursday, January 26

Vanila/ Chocolate Eggless Cake

I have seen Urmila aunty preparing eggless cakes at home for birthdays but this is not the exact version of her's. I got this from a cookery show and tried it; this surprisingly turned out great at the very first go. It is such a straight forward recipe.


Ingredients:

1. 1 cup maida (all-purpose flour)
2. ½ can condensed milk (I used Nestle Milkmaid)
3. ¼ cup ghee (unsalted butter)
4. 1 tsp vanilla essence or 4 spoons of cocoa powder
5. 2 tblsp baking powder
6. ½ cup milk
7. Edible food colors (optional)
8. Candied cherries (Tutti-frutti optional)


Method:

• Sieve flour with baking powder and cocoa powder (In case you want chjocolate flavour)
• Mix condensed milk and butter seperately.
• Roll the flour in the butter mix. Add milk to make the batter thin.
• Mix the cherries and vanilla essence. Put three teaspoonfuls of the coloring on the batter and give it one single swirl with the rolling pin.
• Heat the pressure cooker for 5 mins. Grease and dust the baking dish. Pour the batter in it and place the baking dish in the cooker. Keep the cooker on low flame (sim).
• Insert a toothpick in the cake after half an hour to check if it is done. If the toothpick comes out clean, take out the cake. Cool on a wire rack before serving. The cake should be spongy and spring back on pressing.
* Decorate with icing or nuts or gems as per your imagination and resource availability

TIPS:

* Keep all necessary ingredients handy and then prepare the cake mix immediately; because baking powder would lose its effect after it gets moist
* Let the cake cool a bit before taking it out; hot cake top would stick to the vessel when toppled

Wednesday, January 25

1 2 3 4 . . .

Lemme start it sweet. 1 2 3 4... yeah, the sweet's name is 1234 Cake. This is one of the easiest sweets one can prepare as a learner and I learnt this recipe from my sister, Viju. The name of the sweet explains the portions of ingredients that go in it.

INGREDIENTS:

1. Ghee - 1 Cup
2. Coconut - 2 Cups
3. Sugar - 3 Cups
4. Milk - 4 Cups

METHOD:


• Take all the four ingredients in a deep pan and mix well
• Place it on the stove and close with a lid to avoid spluttering out
• Occasionally take off the lid and stir until the consistency is thick. This will take quite some time say, an hour
• Then take out the lid and stir continuously until the ghee seeps out and the sweet leaves pan
• Take a tray and grease with ghee and pour over the sweet
• Garnish with nuts/ saffron/ rake as required
• Cut into squares/ diamonds once it cools a bit.

TIPS:

* There is no particular order for adding the ingredients. Mix them all at once.
* Keep lid closed until sweet solidifies; else it will splutter on hands and around pan
* Be patient; the moisture in the mixture should completely evaporate to get required consistency
* Cut after few minutes of pouring in the tray when warm, but separate the pieces from tray after it cools down completely

Tuesday, January 24

Basics of cooking...


Usually everyone has their own style and approach of cooking which is balancing and prioritizing the factors such as the health, taste, cost, time taken, presentation, cooking mode, cuisine nativity, hygiene, etc.

Now I am starting to understand my definitions and priorities of these parameters...

We know, health forms the basic rational for food so, it is necessary to take a well balanced diet.

And food has to be tasty for us to relish it; but 'tasty' is two sided, one that the dish has to be prepared to satisfy the palate and other is that one has to develop taste to relish good food as is.

Cost and time; for me these depend on the availability and affordability at that point of time of cooking; I try to get the best out of what is there, be it ingredients or time. Local produce and seasonal ingredients do not only economize your budget but also increases the goodness of food in taste and health.

In daily cooking, presentation can be enough if it is up to a neat platter, good choice of dish, freshness of food and the proper cooking. On occasions it can be garnished, dressed and arranged with some extra effort. Otherwise, I don't expect my food to be too very photogenic all the time.

Cooking mode, I mostly use LPG stove and sometimes induction cooking and microwave. But microwave works good for minimum oil and uniform cooking, as well as baking and grilling.

When it comes to choice of cuisine, I want to try as many as possible. But with my little exploration, it seems for me that Indian cooking offers a lot of choices for vegetarian people. Still, I keep trying other continental dishes that appeal to me. Of course, my all time favorite and comfort food would be south Indian foods.

I try to practice good hygiene as much as possible in my kitchen and on the dining table.

So, with this little understanding about myself...  I am good to go, nah :)

My Cooking Journey


Firstly, I must start with a confession that I am not a great cook at all. Until recently, after I got married and had to cook myself, I never knew that I would like cooking. However, I am developing a passion for it now and this blog is gonna play my teacher. My mom always used to tell that one can easily get the hang of cooking if he/she can taste and relish food.

Well, I can't call myself an elaborate food explorer but I like trying new food, both eating and cooking. Akkama, my paternal granny who recently passed away was known for her innovative cooking; I think we can call her a legend of cooking for her creativity, experimentation, interest, activeness, multitasking, tasting sense and even her metabolism (she used to eat lots of sweets and fried food until she got bed-ridden at the age of 84).  It may seem an exaggeration but for her education level and age that was actually awesome. While my mom is a quick learner of any new recipe, she also is smart at making up dishes or giving them a quick-fix. I admire her confidence in kitchen again considering the walls of liberty she lived in. My amma always encouraged both my sister and me to cook and handle stuff in kitchen independently from the beginning, which could be a reason why kitchen did not intimidate me at all post wedding. I remember an incident of my childhood vacation in our native village when she was preparing elladais, a rice cracker kind of snack; I was just 7 then and I bugged her that I wanted to drop the adai myself into the hot oil which was on the firewood stove (Viragu addupu is not very safe as you can't control the fire level like in hobs), she did not scare me or scream at me instead let me do it and taught me how to do it safer. Thank you ma, for befriending me with kitchen. Viju, my sister is my first conscious inspiration on cooking; she has a great love for cooking. I used to keep helping her at kitchen and lived only watching her cooking until she got married and when I had to cook during amma's and grandma's absence. I can't forget the crazy trials and time that I spent with Viju in the kitchen. They are unforgettable experiences... Kundan, my husband had mentioned before wedding that my mother in law is also known for tasty traditional sweets & savouries. So, summing up I am surrounded by kitchen jambavans and it is definitely a little nervous to venture out into kitchen because the expectations are set high.

Nevertheless, I have some rich experiences of food:  childhood memories of eating north Indian varieties from Urmila aunt's (Our family friend); my time spent as a paying guest in Delhi with a Punjabi family introduced me to aunthentic punjabi cuisine and also I learnt from them the art of loving the food.  Pondicherry, a cosmopolitan town in the real sense is where we siblings were brought up majorly and this in itself had exposed us to variety of culinary tasting right from childhood; be it rajasthani - it has a good marwari population or bengali or french and even the spiritual kitchen of ashram. My hostel dining hall in Bangalore had very good chefs who were dedicated and gave quite interesting menu. Not to mention that our appa is a good explorer; we ate marmalade, cheese, macroons, croissants, mushrooms, pickled gherkins and olives, flax seeds, different kinds of fruits and so so many such stuff which people around us had not even heard of at that time. This probably inculcated in me a slight experimenting attitude.

Pattamma's rasam, Pattathai's pongal- kesari, padma aunty's vadacurry, sindu anni's mango curry, poornima's pav bhaji, Geetha's kaara kuzhambu, Usha akka's idli podi, I really can't end the list...Last but not the least, I want to mention Meenakshi (My ex-colleague & friend) has been a strong stimulus for me in terms of healthy cooking. These keep me all the more excited about the kitchen enterprising. Wish me luck :)