Showing posts with label Roti Varieties. Show all posts

Thursday, September 5

Butter Naan


Naan is a typical tandoori flatbread but I’ve made it in gas stove. I see tandoor cooking in Asian countries as an equivalent to barbeque in western nations.  There are mainly three things that make tandoor or barbeque cooking distinct; they heat the food directly without any medium, help cook at high temperatures and leave food with smoky/ charred flavour.  

Okay coming to my Naan making, it is another fantasy dish for me that I thought was almost impossible in a normal kitchen especially for a beginner; and I proved myself wrong by trying this last week. If I’ve made it that implies, making naan isn’t rocket science at all. I had paired it with lauki koftas that I had shared in the last post and they came out neat. 


Serves:  4

Preparation Time:  15 minutes

Resting Time: 3 hours

Cooking Time:  15 minutes

Ingredients:

1.      Maida – 5 cups
2.    Dry active yeast – 1 tsp
3.    Warm water – ½ cup
4.    Sugar – 1 tsp
5.     Kalonji – 1 tsp
6.    Salt to taste
7.     Butter  as required

Method:

Step 1: Take half a cup of warm water, mix yeast to it and sprinkle sugar for the yeast to improve for 10 minutes.


Step 2: Sieve maida, add required salt, 1 tbsp of soft butter, kalonji and add 
the dissolved yeast.  Mix well and add more water to make a soft dough. Cover and rest it for at least 3 hours.


Step 3: Make the dough into balls of 3 “ diameter and roll into circles or oblong shapes. Tawa fry on both sides for a minutes on both sides in medium heat. Alternatively use a roti maker for easier handling of dough; I prefer that as the dough is relatively stickier than phulka dough.


Step 4: Then either on a perforated papad roaster or directly on the stove roast both sides of the naan to puff it and get that tandoori feel and flavour. Puffing is not necessary.

 
Step 5: Serve greased with butter or topped with a blob of butter.


Friday, August 30

Kezhvaragu Adai or Ragi Roti

Ragi flour is known to be a good home remedy for cold and flu and hence I remember it being prepared at home mostly during rainy days or when someone in the family is ill with cold. The drumstick leaves (murungakeerai) added to  adai fortifies it in addition to the flavour it renders. Ragi which is generally used in south India is a rich source of calcium, iron & fiber and is chosen widely for weight loss.


Serves:  2

Preparation Time:  15 minutes

Cooking Time:  20 minutes

Ingredients:

1.      Ragi or finger millet flour – 2 cups
2.    Onion - 1
3.    Garlic – 5 cloves
4.    Salt to taste
5.     Oil as required
6.    Dry chilies – 2
7.     Mustard seeds – ½ tsp
8.    Asafoetida – 2 pinches
9.    Urad dal – ½ tbsp
10.            Gram dal – 1 tbsp
11.  Curry leaves – 1 sprig
12. Drumstick leaves (murngakeerai) – 1 cup (optional)

Method:

Step 1: Heat oil in a pan, splutter mustards seeds, sprinkle asafoetida, fry urad dal, gram dal, curry leaves and sauté chopped onion and garlic in it then add drumstick leaves to fry for a couple of minutes.


Step 2: Take ragi flour in a mixing bowl, add the seasoning prepared and make soft dough adding some salt and warm water.


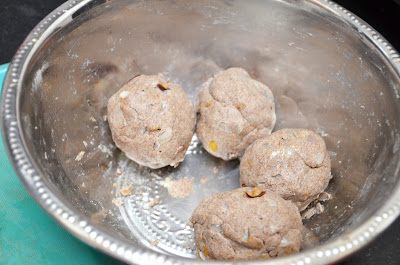
Step 3: Rest the dough for 30 minutes before preparing rotis/ adais.


Step 4: Make lemon sized balls of the entire dough.


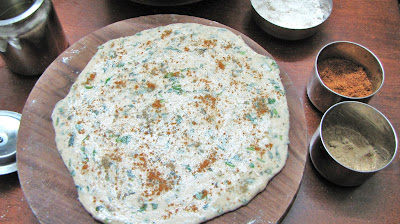
Step 5: On a plastic sheet or plate grease some oil on it, dab some oil in your fingers and pat dough into a 6” circle.


Step 6: Heat dosa tawa, grease oil and roast both the sides of roti/ adai until done.


Step 7: Serve hot topped with some ghee along with grated jaggery.


Friday, June 14

Jowar Roti

I made rotis from the jowar puttu flour that I had bought ready from store; puttu flour renders extra soft rotis compared to usual jowar flour. In north Karnataka, jowar roti is prepared like the phulkas and are considered as one of their staples. However, I had made ‘adai’ like rotis patted by hands that are thicker and slightly chewy. It is a quick rainy season dinner and Kundan liked it well with butter and jaggery.


Serves: 2

Preparation Time: 10 minutes

Cooking Time: 15 minutes

Ingredients:
1.     Jowar flour – 3 cups
2.     Salt to taste
3.     Oil – 1 tbsp + for greasing
4.     Coriander chopped – One fistful
5.     Green chilies – 2
6.     Onion – 1
7.     Asafoetida – 1 pinch

Method:

Step 1: Take jowar flour in a mixing bowl; add a spoon of oil, salt, asafoetida, chopped onion and coriander and knead well with luke warm water.


Step 2: Rest the dough for 15 minutes.
Step 3: Divide the dough into medium sized portions and roll them into balls.
Step 4: Grease a plastic sheet and grease fingers also with some oil and pat the dough ball over the surface with fingers to get 5mm thickness circle.


Step 5: Heat the tawa, grease with some oil or butter and roast the jowar roti on both the sides until well cooked.


Step 6: Serve with a dollop of butter and jaggery. Any thokku goes well with this roti.

Saturday, February 16

Pudina Paratha


Pudina or Mint that we know as a very flavorful and refreshing herb used in various cuisines is also used extensively for relieving from indigestion, respiratory issues, and nervous strain. I was browsing for recipes of pudina paratha and happened hit the blog chakali.blogspot.in from which I’ve adapted this recipe. It came out really well and my husband credited it to be the bestest paratha I’ve ever made, if I can make, anybody can make. So it is surely worth a try for paratha lovers, umm... otherwise also you can give a try.


Serves: 2
Preparation Time: 20 minutes (excluding 30 minutes standing time)
Cooking Time: 15 minutes

Ingredients:
1.      Wheat flour – 2 cups
2.    Salt to taste
3.    Cumin seeds – ¼ tsp
4.    Carom seeds – ¼ tsp
5.     Oil – 1 tbsp
6.    Mint leaves – ½ cup
7.     Coriander leaves – 1/3 cup
8.    Curds – ½ cup (I used butter milk)
9.    Garam masala – 1 tsp
10.            Chaat masala – 1 tsp
11.  Butter – 2 tbsp (optional)

Method:
Step 1: Take atta in a mixing bowl and add to it: salt, cumin seeds, caraom seeds, oil, chopped mint & coriander leaves, ½ tsp of garam masala & chaat masala each (in original recipe masalas weren’t added in the dough) and knead with curds into a soft dough and cover to rest it for 30 minutes.


Step 2: Now divide the dough into 4 or 5 equal portions, roll into balls and then into thin circles with the help of rolling pin and dry flour.


Step 3: Apply a teaspoon of oil on the top surface and sprinkle a pinch of garam masala & chaat masala each.


Step 4: Now make a Japanese fan kind of folds with the top surface upside and hold one end at the centre and circle the other end to join it. You get to see a thick bun with concentric circles like in the picture.


Step 5: Use enough dry flour and gently roll this into thick circular parathas. Repeat for all the parathas.


Step 6: Heat tawa, grease oil or butter and cook it like any paratha on both sides until brown and done.


Step 5: Top with a blob of butter and serve with chilled curds or raita.

Monday, January 7

Gobi Paratha

Stuffed parathas are tedious job for me, but they are well worth the effort; Kundan is fond of them. Someday, if I feel like getting appreciated no-matter-what, I just prepare parathas; from that angle parathas are simple. Usually phool gobi or cauliflower is fried to prepare the stuffing which I did not do, I used it raw but I think frying it slightly gives better texture and flavor. 

Ingredients:

1. Cauliflower florets - 1 cup
2. Onion chopped - 1/2 cup
3. Coriander - 5 sprigs
4. Green Chilies - 2
5. Juice of half a lemon
6. Salt to taste
7. Butter & Oil as required
8. Wheat flour - 2 cups
9. Carom seeds - 1/4 tsp

Method:

Step 1: Knead wheat flour with required salt, carom seeds, a spoon of oil and required water into a soft and elastic dough.
Step 2: Clean the cauliflower florets and grate them (I 'drrr' them in the mixer); chop onion, coriander and green chilies finely.
Step 3: Add cauliflower, onion, green chilies, coriander, salt, chili powder and lemon juiceto a bowl and mix well; this is how I prepared my hassle-free stuffing. [However, the tastier one is got by: spluttering cumin seeds in hot oil; then saute the chilies, onion, grated cauliflower in it; add chili powder, turmeric powder,  garam masala, amchoor powder and finally adding the coriander]


Step 4: Now divide the dough and stuffing into equal number of similar sized portions.
Step 5: With the help of dry flour roll the dough portion and grease center with some oil, place a portion of stuffing in there, fold on top-bottom sides and then side edges towards the center thus forming a square shape.


Step 6: Massage gently with fingers to spread the stuffing inside evenly, then with the help of some dry flour roll it again to a thinner paratha, retaining the shape. Repeat for all parathas.
Step 7: Heat a tawa, grease some oil or butter and roast both the sides to nice brown; ensure the inside is cooked as the parathas are thicker and multi-folded.


Sunday, December 2

Mooli Paratha

Mooli paratha is a very good option to use the radishes for people who do not like them in salads or subjis. Some people make stuffed parathas with radish and some saute the radish before adding but I make a simple  and hastle free version of mooli paratha that I've shared here.

Original recipe Source: No specific source

Ingredients:
1. Radish - 3 small
2. Green chilies - 2
3. Salt as required
4. Wheat flour - 2 1/2 cups
5. Carom seeds - 1/4 tsp
6. Oil - 1 tbsp
7. Butter - 3 tbsp (optional)

Method:
Step 1: Wash, peel and grate the radishes; add little salt and keep it covered for 5 minutes. 
Step 2: In a mixing bowl take wheat flour, salt, carom seeds, oil and  chopped green chilies.
Step 3: When you open the grated radish, you'll see the juice of radish has come out. Now, squeeze the juice in a cup tightly with your fist and add the dry grated radish into the mixing bowl. 
Step 4: Mix the dry ingredients well; then add the extracted radish juice to the dough and mix to get a soft dough. Keep aside for 10 minutes.
Step 5: Divide the dough into equal sized portions say 6 -8 in number. Roll them into flat circles with the help of dry flour.
Step 6: Heat the tawa, grease with some butter and roast one side of the paratha, when you see brown spot on it and bubbles on the other side flip to the other side and roast with some more butter. You can dry roast them or use oil or ghee. 
Step 7: Serve hot with pickle and curds.


TIPS:
* For me usually there would not be need for adding more water as the juice would give enough moisture. In case you use less radish relatively or if the radish that you use is dry, add some plain water.
* If the dough becomes too gummy add some more flour.