Wednesday, January 30

Ragi Putma


The name sounds weird  huh?! But ‘Ragi Putma’ seems to me a more appropriate name because ragi puttu is made and then converted into upma in this recipe making it Puttu+Upuma=Putma. I’ve heard of and had ragi upma in the past, all of which included lots and lots of oil and were tough in texture (I don’t mind the chewiness part though). I loved the taste of it but for the oil because it almost gets cooked in oil; so I always kept exploring on options for a less-oil ragi upma. Yesterday, I happened to search for steamed upma and to my surprise hit many blogs that used steaming approach for ragi upma (which is why I’m not able to quote one). This is definitely worth a try for everyone who like and don’t like ragi. It came out very soft and delicious.


Serves: 2
Preparation Time:  10 min
Cooking Time: 10 min

Ingredients:
1.       Ragi flour – 2 cups
2.       Coconut – 2  tbsp
3.       Salt to taste
4.       Oil – ½ tbsp
5.       Mustard seeds – ½ tsp
6.       Urad dal – ½ tbsp.
7.       Bengal gram – ½ tbsp.
8.       Dry chilies – 2
9.       Asafoetida – 1 pinch
10.   Curry Leaves – 1 sprig
11.   Onion – 1
12.   Garlic – 4 cloves

Method:
Step 1: Mix warm salted water to ragi flour and rub it to get moist puttu mix and cook puttu by filling it between coconut gratings. (Elaborate explanation on puttu making can be seen from the post ‘Puttu With Kadalai Curry’)


Step 2: When the steamed puttu has cooled down, crush it to get a course powder.


Step 3: Heat oil in a kadai: splutter mustard, fry Bengal gram & urad dal, sprinkle asafoetida, thrown in torn curry leaves & dry chilies and sauté the finely chopped onion & garlic in it till soft and slightly brown.


Step 4: Sprinkle some salt and add the crushed puttu and toss well. Turn off heat.


Step 5: Serve hot and eat it plain or with curds if you like.


TIPS:
* I prepared two batches: Served the first batch with ghee, sugar & banana and prepared upma with the other batch; that creates a balance in the palate.
*Leftover puttu can be made into upma.
*If serving for old people and kids, you can avoid frying dals in tadka leaving it a very soft diet.


Sunday, January 27

Senai Kizhangu Masiyal


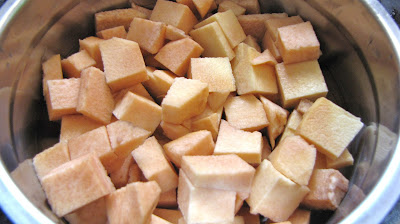
Elephant yam that is called senai kizhangu or karunai kizhangu in Tamil is usually preferred as fry. Elephant yam is low in glycaemic index and rich in omega 3 fatty acids while it renders a very cooling effect to the body. I had cooked ‘masiyal’ which is like a chutney variety; I slightly modified this recipe which is an inspiration from kamalascorner.com on the flow just for convenience.


Serves: 2
Preparation Time: 15 min
Cooking Time: 15 min

Ingredients:

1.     Elephant yam – 1 cup chopped
2.     Shallots or Madras onion – 5
3.     Tamarind – 5” long strip or 2 tbsp pulp
4.     Salt to taste
5.     Oil – ½ tbsp.
6.     Sambar powder – ½ tbsp.
7.     Mustard seeds – ½ tsp.
8.     Urad dal – ½ tbsp.
9.     Asafoetida – 1 pinch
10.  Curry leaves – 1 sprig

Method:
Step 1: Wash, peel and chop yam roughly; steam cook it with salt.


Step 2: Sauté shallots in few drops of oil.
Step 3: Grind boiled yam, shallots, soaked tamarind or its pulp with enough salt into a thin paste.


 Step 4: Heat a pan and prepare tempering by: spluttering mustard seeds, frying urad dal, sprinkling asafoetida and adding curry leaves.
Step 5: To it add the ground paste and sambar powder and stir well.


 Step 6: Once you see bubbles in it and the raw smell goes, switch off the stove and transfer to serving bowl.
Step 7: Serve with hot steamed rice drizzled with ghee.


 TIPS:
*My mom adds red chili to tadka and avoids sambar powder so that no double cooking is required.
*You can sauté the chopped onion in tempering and just mash the cooked yam with the help of masher so that no mixer is required to grind.

Aapam & Thengaipaal


Aapam with coconut milk is a classic combination relished very dearly in Tamilnadu. This is generally had as a holiday breakfast as it is considered sedating and the recipes slightly vary from household to household due to choice of taste and texture. I have inherited the recipe for aapam from my mom and adapted part of the coconut milk recipe from my mom-in-law. Coconut milk is known for healing ulcers though high in saturated fat while poppy seeds have nerve soothing effect and are slightly tranquilizing.


Serves: 4
Preparation Time: 60 min (Soaking & Fermenting time excluded)
Cooking Time: 15 min

Ingredients:
For Aapam:
1.       Raw rice – 1 cup
2.      Idly rice – 2 cups
3.      Fenugreek – 2 tbsp
4.      Salt to taste
5.       Oil as required
For Coconut milk:
1.       Coconut – 1small
2.      Milk – ½ cup
3.      Water – ½ cup
4.      Cardamom – 3
5.       Poppy seeds – ½ tbsp.
6.      Cashew nuts – 4
7.       Sugar – 5 tbsp

Method:
Aapam:
Step 1: Wash and soak both the rice together and fenugreek separately for 2 hours.
Step 2: Grind the fenugreek for 2 minutes first and then add to it the rice and grind until a very fine texture is obtained.
Step 3: Now add slightly less salt than for dosa batter and mix it to thinner than dosa batter consistency.
Step 4: Let it ferment overnight or until it is fluffy and you smell it fermented. Then refrigerate it until use and between uses.
Step 5: For preparing aapams, heat the aapam tawa and slightly grease with oil if required; pour a ladle full of batter in the centre and rotate the tawa by holding in both the hands to flow in circle and form a nice aapam.


Step 6: Cover with lid for 2 min and take out when the centre is cooked and borders look brown. It forms a shallow bowl shape and is soft & porous in the centre and crispy on the edges.
Step 7: Serve hot with coconut milk.


Coconut milk:
Step 1: Soak poppy seeds and cashew nuts in water for an hour.
Step 2: Break and grate or chop the fresh coconut.
Step 3: Grind well the coconut, poppy seeds, cashew nuts, cardamom and sugar in the mixer jar along with the milk.


Step 4: Strain it using a mesh and collect the coconut milk in a bowl. Grind the residue once again with plain water and strain it into the previously obtained coconut milk.
Step 5: Repeat if you think the residue had some juice left in it, else discard it.
Step 6: Stir the coconut milk; adjust sugar and consistency. Refrigerate it immediately, and use within a day or two.


TIPS:
*Prepare Coconut milk an hour in advance and refrigerate it for better taste and convenience.
*Aapam requires minimum or no oil when prepared in non-stick aapam pan.
*Generally grinding in wet grinder renders better batter than mixer ground batter.
*Usually coconut milk is prepared by simply grinding the grated coconut with some water, squeezing and filtering out the milk and adding cardamom powder and sugar to it. If using ready coconut milk, thin it with water or milk, mix cardamom and sugar.


Friday, January 25

Varagu Arisi Pongal

Varagu arisi is Quinoa grain that seemed to have originated from the current day Peru region in South America. Another piece of information: this year has been announced as the international year of quinoa by United Nations. I have heard of the usage of this very nutritious grain in Tamilnadu from my grannies and have had it few times. My mom had bought me some quinoa three months back and I had cooked it only today which I share here.


Serves: 2
Preparation Time: 5 Min
Cooking Time: 20 Min
Quinoa/ Varagu Arisi

Ingredients:
1.       Quinoa – 1 cup
2.      Moong Dal – 1/3 cup
3.      Salt to taste
4.      Turmeric powder – ¼ tsp
5.      Cumin seeds – 1 tsp
6.      Pepper corns – 1 tsp
7.      Asafoetida – 1 pinch
8.     Ghee – 2 tbsp

Method:

Step 1: Wash quinoa and moong dal and pour 3 ½ cups water, soak for 15 minutes and pressure cook with some salt and turmeric.
Step 2: Heat ghee in a tadka pan, splutter cumin seeds & pepper and sprinkle asafoetida.
Step 3: Pour the tempering over the pongal and mix well.
Step 4: Serve hot drizzling some ghee above it with coconut chutney.


TIPS:
*You can add cashew nuts, curry leaves and a couple of dry red chilies in tadka.

Wednesday, January 23

Plain Kadhi


Kadhi is like the north Indian equivalent of south Indian ‘Mor kuzhambu’, both have yoghurt or curds as the base; however, the preparation varies much. I would say kadhi (just the gravy) is easier and hassle free to prepare compared to southern versions, taste-wise both are very different. Plain kadhi which I have shared here is what I call as hot raita for it seems as simple as that.


Serves: 2
Preparation Time: 2 minutes
Cooking Time: 5 minutes

Ingredients:
1.       Curds – 1 cup
2.       Gram flour – 1 tbsp
3.       Turmeric – 1 pinch
4.       Green chilies – 2
5.       Cumin seeds – ½ tsp
6.       Curry leaves – 1 sprig
7.       Asafoetida – 1 pinch
8.       Salt to taste
9.       Sugar – 1 tsp
10.   Oil – ½ tbsp

Method:
Step 1:  Beat the curds to a smooth consistency; mix to it the gram flour and turmeric powder.


Step 2: Heat oil in a pan, splutter cumin seeds, sprinkle asafoetida, add curry leaves and chopped chilies and simmer the stove.
Step 3: Pour in the mixed curds and keep stirring continuously in simmer to prevent curdling.


Step 4: When it thickens and starts to boil add enough salt & sugar and mix well.
Step 5: Turn off stove and transfer to another vessel immediately.
Step 6: Serve hot or warm with Kitchadi or rice or roti.


TIPS:
*Instead of green chilies you can mix red chili powder with the curds and flour which is how it is generally made.


Tuesday, January 22

Turmeric Pepper Milk


For those who have a bad cold, throat infection or congestion in chest or that you simply got drenched in rain, this recipe is a prevention and relief from pain that gives evident results. Turmeric increases immunity while pepper has lots of healing properties. I had learnt this from my mom which in turn is probably from my pattama (maternal granny). Right from my childhood, I hardly take any antibiotics for common cold; this had been the one and only savior for me ever since I can remember. Many relatives and friends had tried and adapted this part of their lives and don’t worry this is not one of those bitter kashayams or kaadas, it is very very soothing as you sip it hot; personally, I love the taste and color.


Serves: 2

Preparation Time: No preparation required

Cooking Time: 5 min


Ingredients:

1. Milk – 2 cups

2. Sugar – 1 tbsp.

3. Turmeric powder – 2 tsp
           4.  Crushed pepper – 1 tsp


Method:


Step 1: Boil the milk in a pan.

Step 2: Add sugar, turmeric, freshly crushed pepper to it and simmer it for 2 minutes.

Step 3: Filter it in a cup and sip it when hot.


TIPS:

* Having it continuously for 3 days will reduce infection and give great results.


Monday, January 21

Zuppa di Minestrone

Zuppa is 'soup' in Italian and the class of soups with pasta and veggies are called 'Minestrone' (pronounced as minis-troney) which is the most popular soup in Italy. I had some leftover pasta and coming across this recipe was very coincidental. I had made this zuppa (I like the sound of this word itself) last night; both of us liked it. Most recipes from internet had almost same recipe and I had given a small twist by adding Szechuan sauce to make it spicy which you can avoid if you prefer to follow the authentic recipe.


Serves: 2
Preparation Time: 15 min
Cooking Time: 20 min

Ingredients:

1.     Cooked pasta – 1 cup
2.     Carrot – 2 medium
3.     Bush beans – 6
4.     Shallots – 6 (Can replace with 2 small onions)
5.     Tomato – 2 small
6.     Garlic – 4 cloves
7.  Bay leaf – 1
8.     Italian seasoning – ¼  tsp
9.     Crushed pepper – ¼ tsp
10.  Salt to taste
11. Olive oil – ½ tbsp.
12. Stock – 3 cups (if unavailable use water)
13. Szechuan sauce – 1 tbsp (Optional)

Method:

Step 1: Clean and dice the vegetables; if cooked pasta is not there, cook it in parallel while cutting vegetables.


Step 2: In a handi, pour oil and add bay leaf, minced garlic and onions. When the onion softens add all other vegetables and toss for a minute with a pinch of salt.


Step 3: Now pour in the stock and add enough salt. Cover and let it cook for 10 minutes.


Step 4: Now open and dissolve a spoon of Szechuan sauce (if you are using); sprinkle Italian seasoning, crushed pepper and put in pasta.


Step 5: Let it cook open for another 5 minutes.


Step 6: Serve hot with bread sticks or relish it as is.